Meshtastic Configuration
The following two sections (Common Configs and Recommended Configs) are intended to help new users understand common use cases and choose settings that work well for them and for the mesh as a whole. Checkout the FAQ page for troubleshooting tips. In our area we are still building out the mesh on the default frequency slot (20) and model preset (LONG_FAST).
Frequency/Preset standardizations for the area:
- LoRa: Modem Preset=LONG_FAST, Frequency slot=20 (906.875MHz)
- LoRa: Modem Preset=MEDIUM_FAST, Frequency slot=45 (913.125MHz)
- LoRa: Modem Preset=SHORT_FAST, Frequency slot=68 (918.875MHz)
- LoRa: 70cm Ham Mode, Licensed amateur radio=yes, Modem Preset=LONG_FAST, Frequency slot=4 (433.875MHz)
Common Configurations
Here are some common configurations and use cases highlighting configurations you should consider using. In all of the below examples, all Meshtastic radios are configured with the default settings, which allow them to communicate with each other over the LongFast channel on the default frequency slot and default modem preset of LONG_FAST with ham mode not enabled.
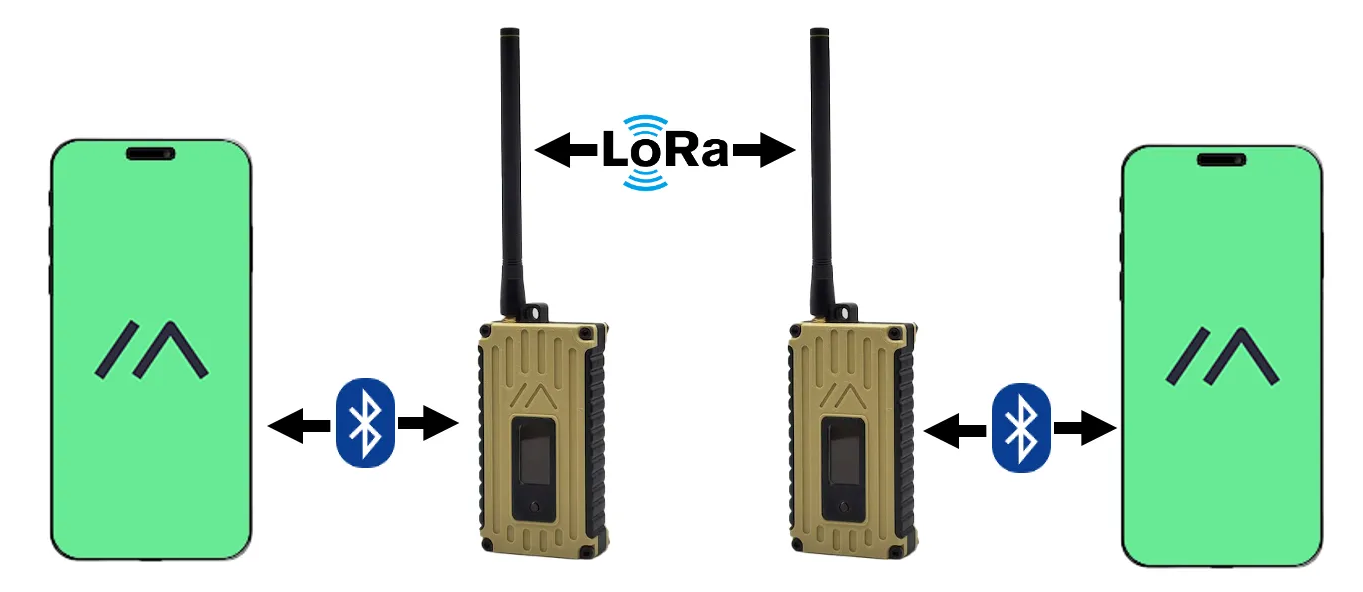
Commonly, users have a Meshtastic radio paired with their phone via bluetooth, they are then able to send and receive messages with other Meshtastic users using the app on their phone. No internet connection is required. Both of these nodes are within LoRa range of each other.
When users are not within range of each other, they can utilize the mesh that meshtastic offers. Your messages do not have to be received directly by another user, they can hop over users of the network until they arrive at their destination or stop trying. Be sure to review the New User Expectation above if you are a first time user.
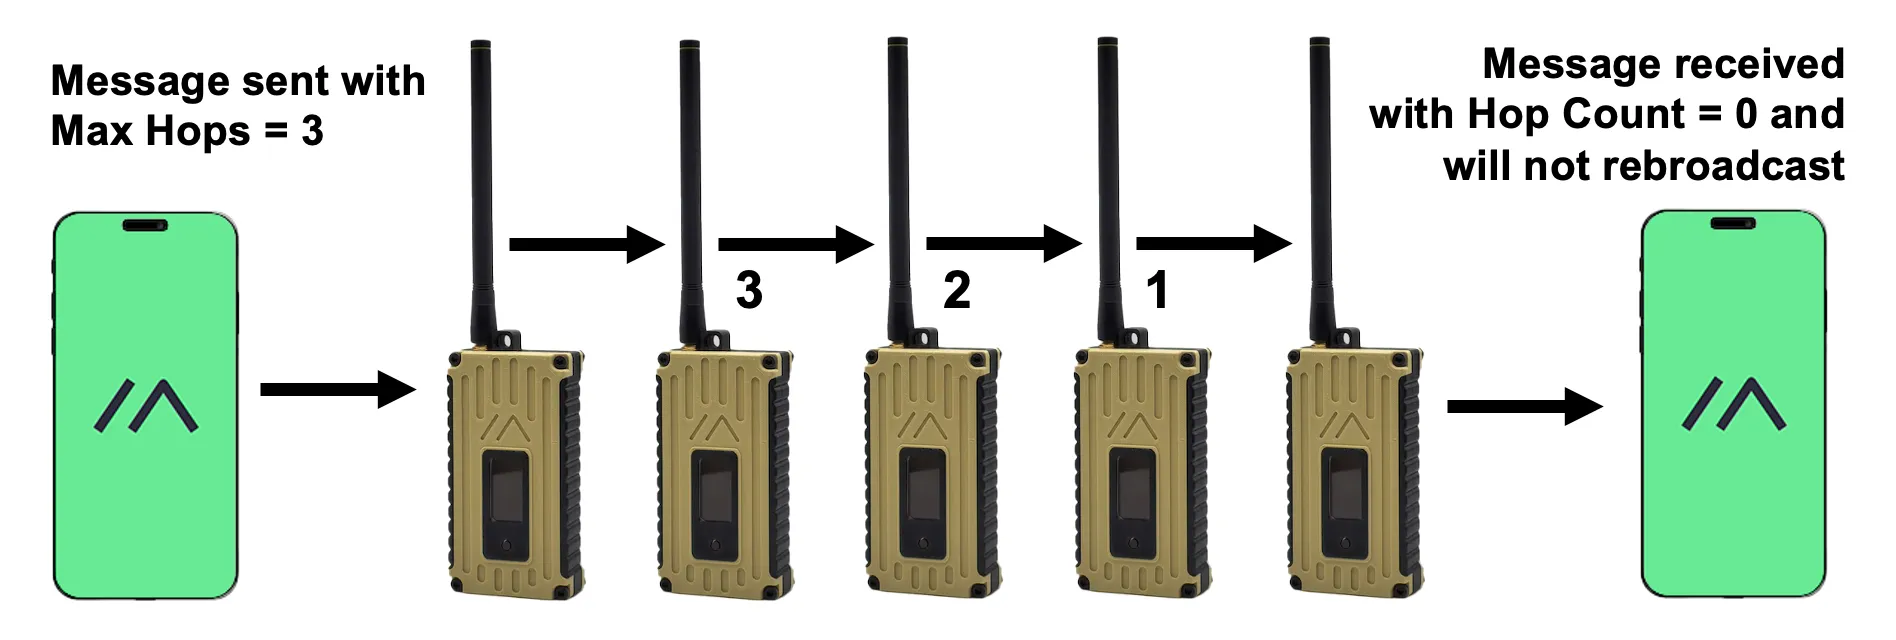
Understanding "hops"
Meshtastic uses the term "hop" to refer to the number of nodes between the sender and receiver. It is always recommended that you use the lowest hop count possible that allows you to reach your intended recipient. As you can see below, using the default hop count of 3 means that your messages can cover many many miles.
Recommended Configurations
Can't find a setting? Check the Meshtastic docs for more info - each page has tabs for iOS, Android, CLI, and Web.
Fixed Nodes
If your node will move, please use the portable node configuration
- Long name: Please consider adding "📵" to your node long name for nodes that are not monitored.
- Licensed amateur radio:
FALSE
- Role: usually should be
CLIENTorCLIENT_MUTEor other roles as appropriate by situation. It is rare thatROUTERorREPEATERare appropriate, so please consult with the group on Discord before doing so. We have a channel dedicated to router node owners, so that they can be reached if their node causes problems for others. Please share the position for any Router mode nodes with the mesh. - Node Info Broadcast Interval:
10800seconds
- GPS Mode:
ENABLEDif your device has a GPS receiver, otherwise use the Fixed Position option. - Fixed Position:
TRUEis often appropriate for fixed nodes, but not required. This can be set via CLI or sent from phone GPS. - Broadcast Interval:
18000seconds
- Region:
US - Hop Limit:
3(Please strive to use as few hops as possible, especially for unmonitored fixed nodes.) - OK to MQTT:
TRUE- this allows packets to be uploaded to MQTT, required to show up on the map if not directly uploading to MQTT. Note: this is a request and may not necessarily be honored.
If present & desired to be enabled (optional)
- Enabled:
TRUE - Pairing Mode:
Random PINorFixed PIN(if no screen/ screen visible to public: fixed; else either as desired). - PIN: (if fixed) anything but
123456- remember to change this if using fixed PIN.
NOTE: Neighbor Info is no longer shared across the mesh on long_fast
Portable Nodes
- Role:
CLIENT_MUTEis recommended for portable nodes butCLIENTis an acceptable alternative.ROUTER,REPEATER, andROUTER_CLIENTshould not be used. For more information see the Meshtastic docs. - Node Info Broadcast Interval: as low as
1200seconds
- GPS Mode:
ENABLEDif present, elseNOT_PRESENT. Note: when connected to iOS or Android, phone GPS can be relayed to the node if the node does not have GPS. - Fixed Position:
FALSE, please do not set a fixed position if your node is moving. - Broadcast Interval: as low as
1200seconds
- Region:
US - Hop Limit:
3 - OK to MQTT:
TRUE- this allows packets to be uploaded to MQTT, required to show up on the map if not directly uploading to MQTT.
If present & desired to be enabled (optional)
- Enabled:
TRUE - Pairing Mode:
Random PINorFixed PIN(if no screen/ screen visible to public: fixed; else either as desired). - PIN: (if fixed) anything but
123456- remember to change this if using fixed PIN.
Please do not enable neighbor info for portable nodes as it makes telemetry difficult to interpret NOTE: Neighbor Info is no longer shared across the mesh on long_fast
- Enabled:
FALSE
Get on the Map
The following changes are necessary for your node to appear on the map.
- Allow Position Requests:
TRUE - Precise Location:
TRUE - Approximate Location: Choose a value you are comfortable with.
If Enabling MQTT
- Uplink Enabled:
TRUE - Downlink Enabled:
FALSEThis prevents your node from flooding the mesh with messages from the internet on LongFast.
Enabling MQTT will guarantee you will appear on the map, otherwise you must have "OK to MQTT" (Found under LoRa), position on, and connect to a node uplinked to MQTT.
- Enabled:
TRUE - MQTT Server Address:
meshtastic.pugetmesh.org- this server is required to show up on our map. - Username/Password: Leave default or go to the map for details.
- Encryption Enabled:
TRUE - JSON Enabled:
FALSE - TLS Enabled:
FALSE - Root Topic:
msh/US - Map Reporting Enabled:
TRUE - Map Report Publish Interval: Fixed:
3600, Portable:300 - Approximate Location: Choose a value you are comfortable with.
Local Channels
Warning
We no longer use or recommend using QR codes or Meshtastic URL's for sharing channels. These methods can also modify your LoRa settings such as hop count and "OK to MQTT" with no ability for the user to verify in the app. For these reasons we are sharing the channel name and key directly. You must enter both of these correctly in order to join the channel.
LongFast
This is the default channel and the channel that we use the most in our area. Note: This channel has some special considerations in the firmware so you may see inconsistent behavior between settings for this when set as your default channel vs other channels. As always, channel names are case sensitive.
| Channel Name | PSK | Modem Preset | Slot | Ham Mode |
|---|---|---|---|---|
| LongFast | AQ== | LONG_FAST | 20 | Off |
ShortFast
This is the default channel, and slot, for the ShortFast modem preset.
| Channel Name | PSK | Modem Preset | Slot | Ham Mode |
|---|---|---|---|---|
| ShortFast | AQ== | SHORT_FAST | 68 | Off |
PS-Mesh!
There are more channels than the default LongFast, one of them is our PS-Mesh! channel which you are welcome to join and is related to this group. be sure to pay attention when adding the channel so you don't replace your current channels.
| Channel Name | PSK | Modem Preset | Slot | Ham Mode |
|---|---|---|---|---|
| PS-Mesh! | jHrxpQOq6dEBC5Ldr3ULrQ== | LONG_FAST | 20 | Off |
PS-MQTT!
If you wish to communicate with others in the area over MQTT, use this channel. You will need to enable "OK to MQTT" under the LoRa settings, and you will need to enable uplink and downlink for the channel. Reminder that connecting your node to MQTT does send your data to the mqtt server. You do not need to directly connect your node to MQTT for this to work.
| Channel Name | PSK | Modem Preset | Slot | Ham Mode |
|---|---|---|---|---|
| PS-MQTT! | mqttmqttmqttmqttmqttQQ== | LONG_FAST | 20 | Off |
All Messages sent to PS-MQTT! (that are received by a node connected to the MQTT server) are published to our ps-mqtt Discord Channel. Select the thread you want to view at the tip right.